Basic Airway Management
last authored: Oct 2014, David LaPierre
last reviewed: Nov 2014, Rebecca Whiting
Introduction
Basic airway management describes life-saving techniques for patients who are not breathing, or breathing ineffectively. It involves opening the airway and providing ventilatory support through mouth-to-mouth or positive pressure ventilation with a bag-valve-mask.
These skills are normally a component of further resuscitation efforts, including basic life support.
Assessment
Assess a patient’s breathing clinically in three ways: look, listen, and feel:
- look for the chest rising and falling, and at the patient’s colour
- listen for air escaping from the mouth or nose
- feel for air against your cheek
When considering difficulty in ventilating a patient, the acronym BOOTS is helpful for identifying challenging features:
- beard: use vaseline or cream to improve seal
- obese: place blankets between shoulder blades to expand chest
- older: head/neck position
- teeth: is the patient edentulous? keeping the dentures in may help
- snores/stridor (obstruction)
Opening the Airway
An unconscious patient should be placed on their back in order to begin opening the airway and provide access for resuscitation. Ensure spinal precautions are used, especially providing stabilization of the cervical spine, if spinal trauma is suspected.
The simplest way of ensuring an open airway is to use a head-tilt, chin lift technique, thereby lifting the tongue from the back of the throat.
If trauma is suspected, use a jaw thrust instead. The jaw thrust is a technique used on patients with a suspected spinal injury and is used on a supine patient. The clinician uses their thumbs to physically push the posterior (back) aspects of the mandible upwards. Lifting the mandible forward, pulls the tongue forward and prevents it from occluding (blocking) the entrance to the trachea.
Look for foreign objects visible in the mouth, and remove carefully if seen. Suction can be used, if available, if foreign objects, secretions, or vomit is present.
Bag-Valve-Mask
The Bag-Valve-Mask (BVM) is the normal method of ventilating patients.
Stand behind the patient for maximum effectiveness. Look just below the clavicles for chest rise.
The E-C grip is often used, describing the formation of a C with the thumb and index finger wrapped around the bag, and the remaining three fingers forming an E under the chin to obtain a jaw thrust and a tight seal. Ensure you have a good head tilt if C spine precautions are not in place, to ensure open-airway.
A jaw thrust can initially be done with two hands, and then held in position with just one.
However, there is widespread concern about the use of the E-C grip to provide an effective seal. Given frequent air leaks, many clinicians advocate the use of two person bagging, whereby one person uses both hands to obtain a jaw thrust and a tight seal, and the other bags. Even if two people are not available, two hands may still be used to form a seal, with the elbow and side used to compress the bag.
Avoid excessive ventilation – either too frequent or too large a volume. Hyperventilation can lead to increased thoracic pressure, decreasing cardiac output and venous return to the heart. Air can also enter the stomach, potentially leading to vomiting and aspiration. These can cause serious complications.
In infants and children this is even more important – a puff of air is all that is needed.
Mouth-to-Mouth
If a bag-valve-mask is not available, mouth-to-mouth resuscitation is necessary. The risk of infection is certainly present, and protection, either with a face mask or other portable plastic barrier device, is warranted. If protection is unavailable, it is up to the rescuer’s discretion as to what potential risks they are willing to take.
With the airway open, either place the mask over the patient’s mouth and nose, or pinch the nose and make a tight seal with your mouth over the patient’s mouth. In infants and small children, your mouth may cover both the patient’s mouth and nose.
Provide two quick breaths, watching for the chest to rise and fall, and assessing for the movement of air by listening and feeling.
Again ensure you are not over-ventilating, particularly with infants and children.
Airway Adjuncts
Airway adjuncts – oropharyngeal or nasopharyngeal airways – can also be used to prevent the tongue from blocking the airway. When these airways are inserted properly, the rescuer does not need to manually open the airway with a head tilt/chin lift or jaw-thrust maneuver. Aspiration of blood, vomitus, and other fluids can still occur with these two adjuncts.
Oropharyngeal Airway

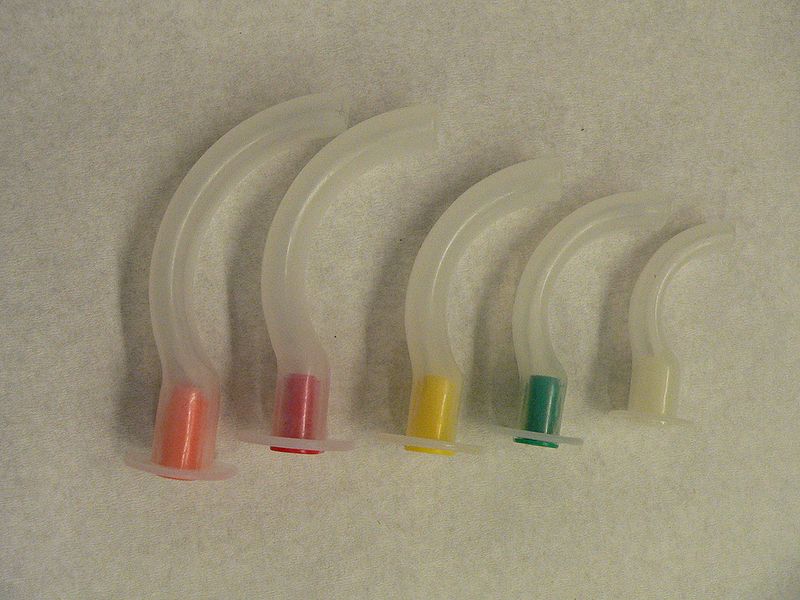
Oral pharyngeal airways, various sizes; courtesy of Rama
An OPA should be measured against the side of the face. With the tip of the OPA at the corner of the mouth, the opening should be at the angle of the mandible.
Insert upside down, rotating as it reaches the pharynx.
Suction as needed.
Nasopharyngeal airway
An NPA is a soft rubber tube that protects airflow from the nose to the pharynx.
They may be used in conscious or semiconscious patients.
Size: The tube should be similar in size to the interior aperture of the nares. The patient’s smallest finger can also be used as an estimate.
Lubricate the tube, with anesthetic used as appropriate.
Suction as needed.
Moving Beyond Basic Airway Management
In some cases, basic airway management is inadequate to provide or sustain ventilation. In others, it is clear that respiratory support will be necessary for extended time. In both these situations, proceeding to secure an advanced airway is recommended; as described in this topic.
